
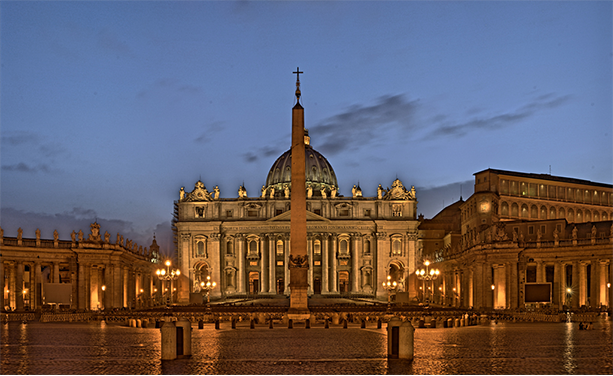
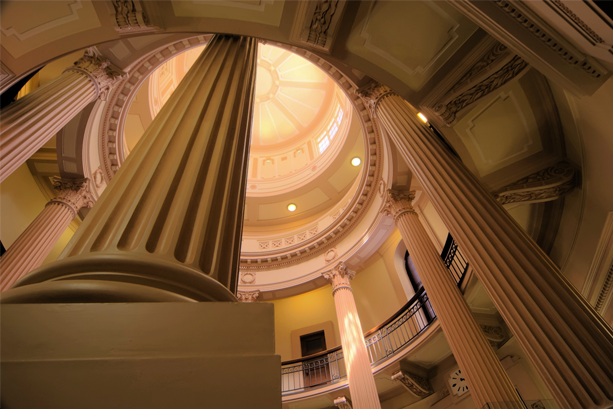
HDR stands for High Dynamic Range, and HDR photography utilizes technology that allows you to capture a much wider range of lighting, colors and details than is possible with a standard camera alone.
What are the benefits and uses of HDR photography? HDR photography utilizes technology that allows you to capture a much wider range of lighting and colors than is possible with a standard digital camera alone. Our HDR software combines three or more differently exposed photos of the same scene into a single photo that accurately captures the details and vivid colors of the world as it is seen through your eyes. The advantage of HDR technology is that it retains details that are lost with standard digital cameras and it reproduces vivid colors in both the light and dark areas of a photo simultaneously.

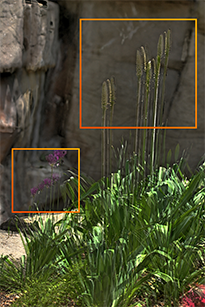
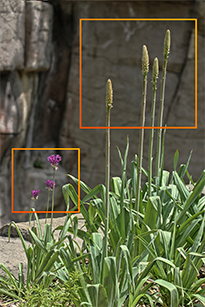
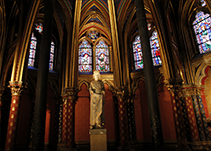
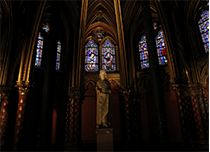
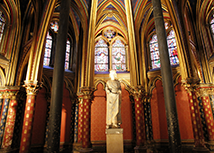
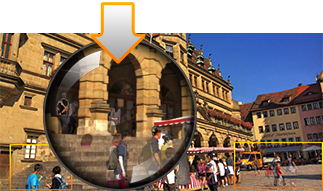
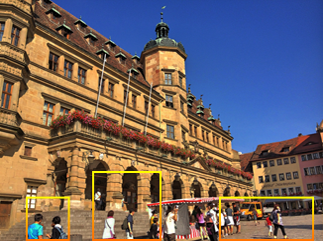
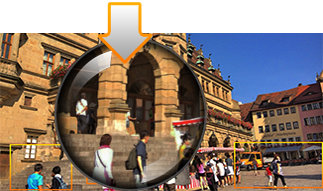
What is Alignment? It's not always possible to keep the camera completely still when taking a sequence of two or more photos in a row. Any number of factors can cause the camera to shift ever so slightly. When merging the photos, it is critical that the coordinates of every pixel are aligned perfectly in order to create a sharp HDR photo. Our advanced Alignment technology takes care of this for you so you get crystal clear results every time.
What does the Ghost Reduction feature do? Moving objects are one of the biggest obstacles to creating high-quality HDR photos. When shooting multiple photos of the same scene, a moving object will appear in different positions within the frame. With other HDR software applications, these objects may appear ghost-like on the final merged HDR photo. To solve this problem, we developed advanced "ghost-reduction" technology to intelligently reduce the ghost-like effect caused by moving objects.
What is Tone Mapping? Usually, the first step of HDR software is to merge photos with different exposures into a digital HDR negative, which is also called a 32-bit float pointing radiance map. Compared with conventional 8-bit image formats like JPEG or BMP, the 32-bit float pointing format has the capability to record a much wider range of values, and can thus accurately capture the full dynamic range of the real world. However, a 32-bit float pointing value cannot be displayed or printed on current 8-bit monitors or printers. Therefore, although a 32-bit float pointing radiance map records extremely accurate values, at this stage they are just meaningless numbers from the user's perspective because the results cannot be seen. "Tone Mapping" is the technology used to convert a 32-bit float pointing format to 8-bit images for display or print. Since 32-bit float pointing radiance map is also referred to as the digital HDR negative, Tone Mapping can be regarded as a kind of photo development, but for digital photos.
What is the difference between Global Tone Mapping and Local Tone Mapping? Global Tone Mapping technologies refer to techniques that use a monotonic mapping curve to independently transfer real-world lighting and color to your display. These technologies are relatively fast and simple, but the results disappoint. Local Tone Mapping technologies on the other hand, take into consideration the information of adjacent pixels in mapping processing so that each individual pixel is analyzed according to the information of neighboring pixels. This type of technology takes longer for your computer to process however. With most HDR software applications, Global Tone Mapping technologies are used to preview images quickly, while Local Tone Mapping technologies are used to prepare the final results for display or printing. Our advanced Local Tone Mapping technology simulates the adaptive and local properties of the human vision system for superior results.
Local Tone Mapping

Original exposure bracketed photos
HDR Darkroom's Local Tone Mapping

Original exposure bracketed photos
HDR Darkroom's Global Tone Mapping
How many photos do I need to take in order to produce a high quality HDR photo? In order to create high quality HDR photos, it is strongly recommended that you take at least three photos of the same frame at different exposure levels. In theory the more photos you shoot, the better the quality of the HDR photo that can be produced. In practice however, we have found that there is no significant difference between five, and more than five differently exposed photos.
What is the ideal exposure spacing? It depends on the scene. For many outdoor scenes, three exposures spaced one or two EVs apart are usually sufficient. However, for an interior scene with an outside view on a sunny day, the range of light contrast can be extremely high. For exposure spacing in this situation, we usually recommend an increment of 1 or 2 EVs.
What are the benefits and uses of HDR photography? HDR photography utilizes technology that allows you to capture a much wider range of lighting and colors than is possible with a standard digital camera alone. Our HDR software combines three or more differently exposed photos of the same scene into a single photo that accurately captures the details and vivid colors of the world as it is seen through your eyes. The advantage of HDR technology is that it retains details that are lost with standard digital cameras and it reproduces vivid colors in both the light and dark areas of a photo simultaneously.
What is Alignment? It's not always possible to keep the camera completely still when taking a sequence of two or more photos in a row. Any number of factors can cause the camera to shift ever so slightly. When merging the photos, it is critical that the coordinates of every pixel are aligned perfectly in order to create a sharp HDR photo. Our advanced Alignment technology takes care of this for you so you get crystal clear results every time.
Example 1


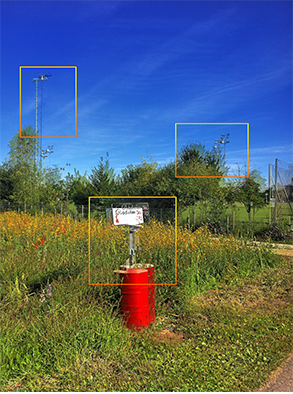
Without HDR Darkroom's Alignment
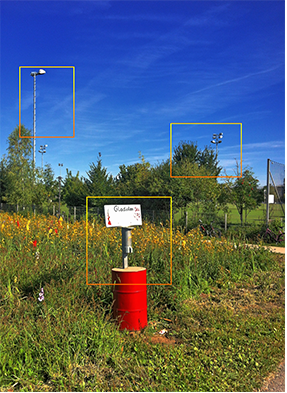
With HDR Darkroom's Alignment
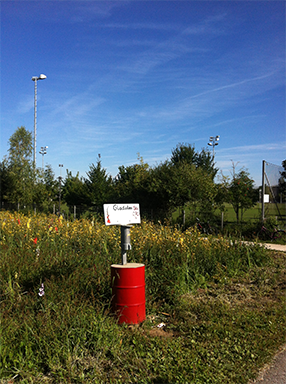
Original exposure bracketed photos
Without HDR Darkroom's Alignment
With HDR Darkroom's Alignment
Example 2

Without HDR Darkroom's Alignment

With HDR Darkroom's Alignment
Original exposure bracketed photos
Without HDR Darkroom's Alignment
With HDR Darkroom's Alignment
Example 3

Without HDR Darkroom's Alignment
With HDR Darkroom's Alignment
Original exposure bracketed photos
Without HDR Darkroom's Alignment
With HDR Darkroom's Alignment
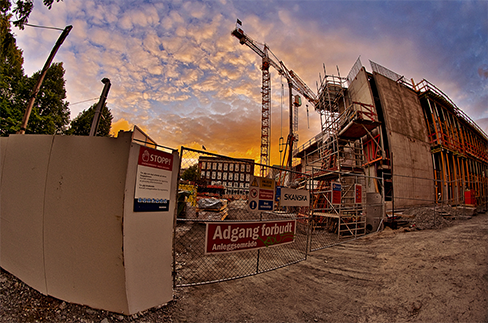
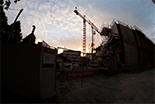
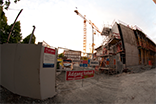
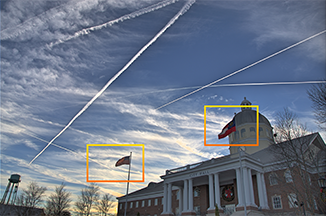
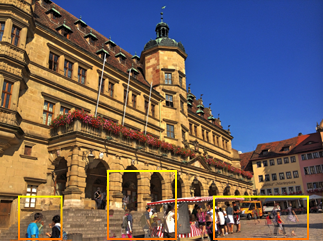
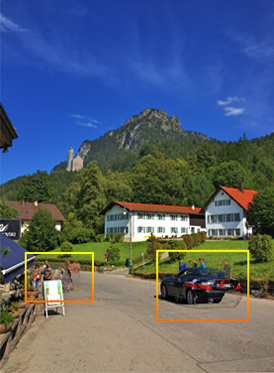
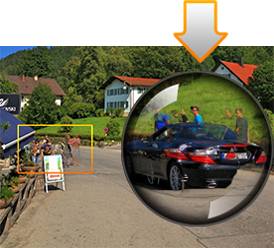
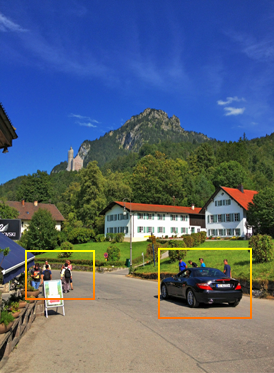
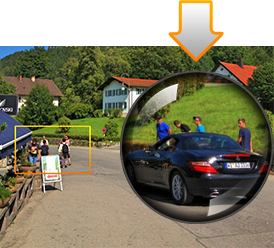
What does the Ghost Reduction feature do? Moving objects are one of the biggest obstacles to creating high-quality HDR photos. When shooting multiple photos of the same scene, a moving object will appear in different positions within the frame. With other HDR software applications, these objects may appear ghost-like on the final merged HDR photo. To solve this problem, we developed advanced "ghost-reduction" technology to intelligently reduce the ghost-like effect caused by moving objects.
Example 1


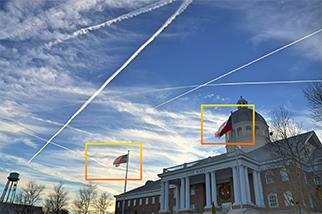
Without HDR Darkroom's Ghost Reduction
With HDR Darkroom's Ghost Reduction
Original exposure bracketed photos
Without HDR Darkroom's Ghost Reduction
With HDR Darkroom's Ghost Reduction
Example 2
Without HDR Darkroom's Ghost Reduction
With HDR Darkroom's Ghost Reduction
Original exposure bracketed photos
Without HDR Darkroom's Ghost Reduction
With HDR Darkroom's Ghost Reduction
Example 3
Without HDR Darkroom's Ghost Reduction
With HDR Darkroom's Ghost Reduction
Original exposure bracketed photos
Without HDR Darkroom's Ghost Reduction
With HDR Darkroom's Ghost Reduction
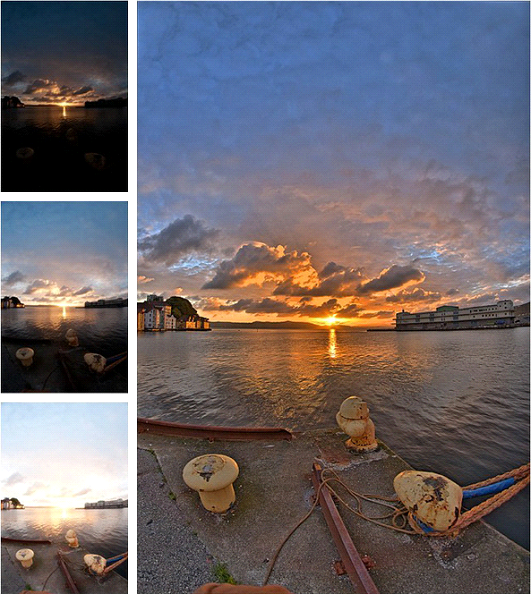
What is Tone Mapping? Usually, the first step of HDR software is to merge photos with different exposures into a digital HDR negative, which is also called a 32-bit float pointing radiance map. Compared with conventional 8-bit image formats like JPEG or BMP, the 32-bit float pointing format has the capability to record a much wider range of values, and can thus accurately capture the full dynamic range of the real world. However, a 32-bit float pointing value cannot be displayed or printed on current 8-bit monitors or printers. Therefore, although a 32-bit float pointing radiance map records extremely accurate values, at this stage they are just meaningless numbers from the user's perspective because the results cannot be seen. "Tone Mapping" is the technology used to convert a 32-bit float pointing format to 8-bit images for display or print. Since 32-bit float pointing radiance map is also referred to as the digital HDR negative, Tone Mapping can be regarded as a kind of photo development, but for digital photos.
What is the difference between Global Tone Mapping and Local Tone Mapping? Global Tone Mapping technologies refer to techniques that use a monotonic mapping curve to independently transfer real-world lighting and color to your display. These technologies are relatively fast and simple, but the results disappoint. Local Tone Mapping technologies on the other hand, take into consideration the information of adjacent pixels in mapping processing so that each individual pixel is analyzed according to the information of neighboring pixels. This type of technology takes longer for your computer to process however. With most HDR software applications, Global Tone Mapping technologies are used to preview images quickly, while Local Tone Mapping technologies are used to prepare the final results for display or printing. Our advanced Local Tone Mapping technology simulates the adaptive and local properties of the human vision system for superior results.
Local Tone Mapping
Original exposure bracketed photos
HDR Darkroom's Local Tone Mapping
Original exposure bracketed photos
HDR Darkroom's Global Tone Mapping
How many photos do I need to take in order to produce a high quality HDR photo? In order to create high quality HDR photos, it is strongly recommended that you take at least three photos of the same frame at different exposure levels. In theory the more photos you shoot, the better the quality of the HDR photo that can be produced. In practice however, we have found that there is no significant difference between five, and more than five differently exposed photos.
What is the ideal exposure spacing? It depends on the scene. For many outdoor scenes, three exposures spaced one or two EVs apart are usually sufficient. However, for an interior scene with an outside view on a sunny day, the range of light contrast can be extremely high. For exposure spacing in this situation, we usually recommend an increment of 1 or 2 EVs.