


1. Introduction
1.1 A Brief Introduction to HDR Photography
1.2 Introduction to HDR Darkroom 3
2. HDR Darkroom 3 Workflow
2.1 HDR Composition Workflow
2.2 Saving your adjustments as a Custom Style
2.3 Controls on the bottom edge of the viewer
3. Batch Processing
3.1 Batch merging bracketed photos into HDR images
3.2 Batch converting single 16-bit RAW files to 8-bit images
4.Export and Share
5. Preferences
5.1 Color Mangagement
5.2 Rendering intent
1. Introduction
1.1 A Brief Introduction to HDR Photography
HDR stands for High Dynamic Range, and HDR photography utilizes technology that allows you to capture a much wider range of lighting, colors and detail than is possible with a standard camera alone.1.1.1 What are the benefits and uses of HDR photography?
HDR software combines three or more differently exposed photos of the same scene into a single photo that accurately captures the details and vivid colors of the world as seen by the naked eye. The advantage of HDR technology is that it retains detail that is lost with standard digital cameras and it reproduces vivid colors in both the light and dark areas of a photo simultaneously.1.1.2 What is Tone Mapping?
Usually, the first step of HDR software is to merge photos with different exposures into a digital HDR negative, which is also called a 32-bit float point radiance map. Compared with conventional 8-bit image formats like JPEG or BMP, the 32-bit float point format has the capability to record a much wider range of values, and can thus more accurately capture the full dynamic range of the real world. However, a 32-bit float point value cannot be displayed or printed on current 8-bit monitors or printers. Therefore, although a 32-bit float point radiance map records extremely accurate values, at this stage they are just meaningless numbers from the user's perspective because the results cannot be seen. "Tone Mapping" is the technology used to convert a 32-bit float point format to 8-bit images for display or print. Since a 32-bit float point radiance map is also referred to as the digital HDR negative, Tone Mapping can be regarded as a kind of photo development, but for digital photos.1.1.3 A brief introduction to making HDR photos:
Take three photos of the same scene with different exposure values (like the photos above) and import these photos into HDR software. These photos will be merged into a single radiance map (i.e. HDR negative). Then Tone Mapping is used to convert the digital HDR negative into a displayable HDR image (the merged photo with richer details and colors is shown below). Our HDR Darkroom 3 is innovative HDR software that uses this technology to help you to create gorgeous HDR photos with minimal effort.1.2 Introduction to HDR Darkroom 3
An all-in-one professional HDR application designed to help you rapidly and easily produce stellar results.
1.2.1 Sophisticated HDR Technology:
HDR Darkroom 3 includes a range of advanced HDR technologies, including alignment technology, ghost reduction technology, noise reduction, local/global tone mapping technology, and more to help you easily produce spectacular images at the fastest speeds available today.1.2.2 User-Friendly Interface:
By working with professional photographers to understand their workflow, we designed HDR Darkroom 3 specifically for ease of use, but without compromising on control.1.2.3 Our new HDR Styles give you more ways to be bold:
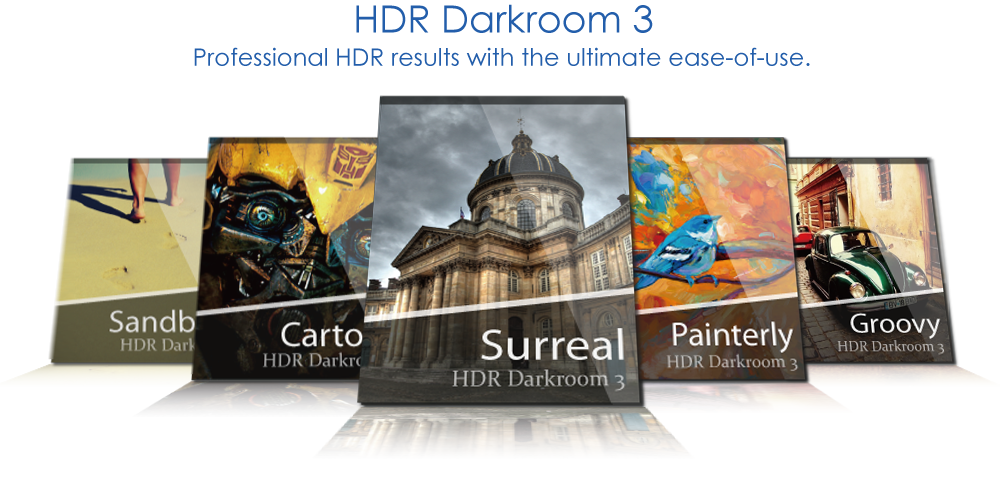
Choose from our HDR Styles to quickly and easily give yourself more editing options. Change up the look of your image, from realistic to artistic to futuristic. You can also modify and save them as your own Custom Styles.1.2.4 Alignment Technology:
Our powerful Alignment technology corrects problems with misalignment when your camera moves slightly between the bracketed frames.1.2.5 Ghost Reduction Technology:
If an object moves through the scene while you are taking multiple shots, our Ghost Reduction technology corrects the problem of "ghosting" when the images are combined.1.2.6 Real Time Processing:
Nearly all of the processing controls in HDR Darkroom 3 are real time, making HDR Darkroom 3 the fastest processing HDR software on the market with real time processing as a standard feature. Don't spend your time sitting in front of a computer. Get back out there and take more great photos!1.2.7 Powerful Batch Processing:
Our HDR Darkroom 3 Batch Processing Engine automatically handles multiple sets of photos according to your unique preferences. Let us do the work for you and harness the power of batch processing to save you countless hours of manual adjustments.1.2.8 Camera RAW File Converter:
HDR Darkroom 3 supports RAW files of more than 150 camera models, including Canon, Nikon, Sony, Olympus and Panasonic, as well as Adobe (DNG), etc. New formats will be included in future releases once they become available.1.2.9 Export to Social Media:
We've made it easy for you to share your amazing HDR images on all the popular social media and photo sharing websites like Facebook, Twitter and Flickr. With a single click you can upload your photos for all of your friends and family to see, or put yourself out there and share your work with an even bigger audience.Advanced features (compared with HDR Darkroom 2 Pro):
- Light/Color control at your fingertips:
HDR Darkroom 3 gives you control over more than 30 parameters, so you can fine tune and control your final results. Many levels of adjustments are available on features such as curve adjustment, color balance, color temperature and tint adjustment, lens correction, highlight/shadow adjustment, black/white point adjustment, and noise reduction. With HDR Darkroom 3, digital photography processing tasks can be done seamlessly and with results so good you will never need to use another application.
- Fully Realized Color Space Management:
HDR Darkroom 3 is the first HDR software with comprehensive color space management. Our HDR Darkroom 3 developers have created color space management tools with a short learning curve, but without compromising on professional level capability. Click here to download the fully-functional free trial version and see for yourself!
2. HDR Darkroom 3 Workflow
2.1 HDR Composition Workflow
Step 1: Taking HDR photos of a scene
In order to create the best HDR images, be sure to take enough photos (at least 2) with different exposures. Taking 3-5 differently exposed (preferably by varying the shutter speed) photos will ensure that you cover the full dynamic range of the scene.
Most digital cameras on the market also offer an Auto-Exposure Bracketing (AEB) function, which makes capturing HDR photos easy. Our HDR Darkroom 3 software enables you to align images if the camera moves slightly between frames, but it is best to use a tripod if possible.
Step 2: Open your HDR Darkroom 3 workspace
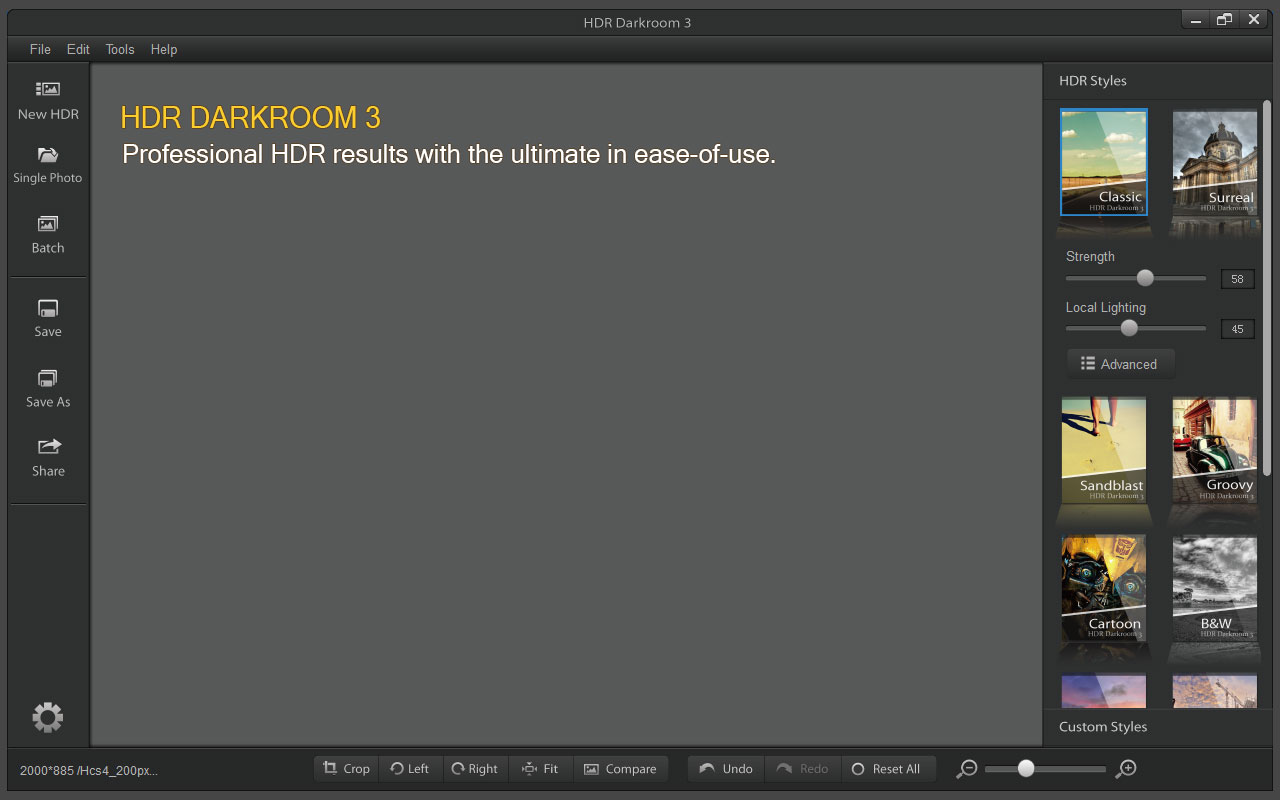
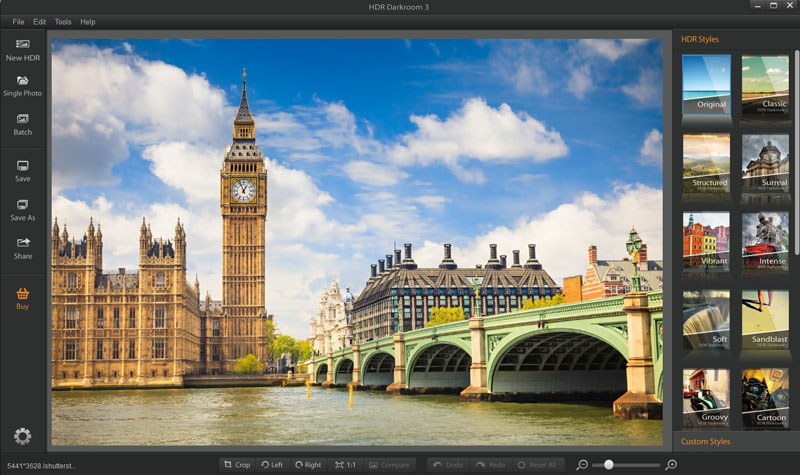
Open HDR Darkroom 3 on your computer by double-clicking on the application's desktop icon, or on Windows enter through the Start menu and select HDR Darkroom 3 from the list of installed programs. The workspace of HDR Darkroom 3 is shown below.
Step 3: Import bracketed photos into your workspace
Click the New HDR icon ( ) on the left-hand side of your screen. You can also create an HDR photo from the File menu and select Create HDR. The merge dialog box will then appear. Click on the Browse button to select the bracketed photos that you want to process, otherwise click on the Remove button to remove photos from your workspace.

Note: You can also use the Open a File button ( ) below New HDR to open a single image and apply all HDR effects to your single image. However, the true strength of HDR lies in using multiple images with different exposures to bring out all the detail and color possible.
Step 4: Generate an HDR photo
First, select the HDR Merge options that you would like to use at the bottom of the dialog box.
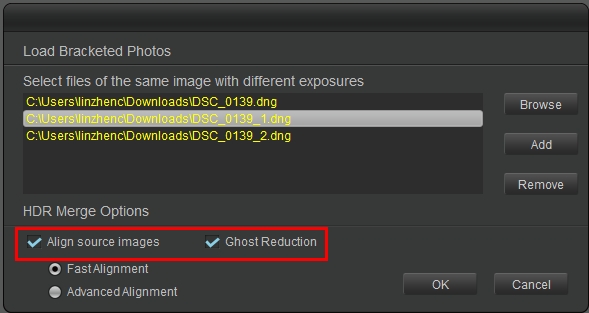
- Alignment:
By selecting the Alignment options, photos will be aligned using a feature-matching method and then be merged into a digital negative (32-bit float point HDR radiance map). The Alignment feature helps to compensate for both translational and rotational movement and even distortions during the capture process. Otherwise, photos will be merged without applying any alignment technology and may appear out of focus or fuzzy. Fast Alignment is selected by default, but you can select Advanced Alignment for the best results (with slightly longer processing time).
- Ghost reduction:
By selecting the Ghost Reduction option, objects that might have moved slightly from one exposure to the other will be rendered correctly.
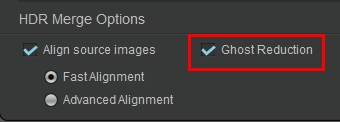
Once you have specified your preferences, click OK to continue.
HDR Darkroom 3 will then process the selected photos and merge them into an HDR photo. Note that the “Natural” HDR Style is applied as the default setting at this stage. In the next step you can specify the HDR Style or Tone Mapping settings you prefer.
Step 5: Applying HDR Styles
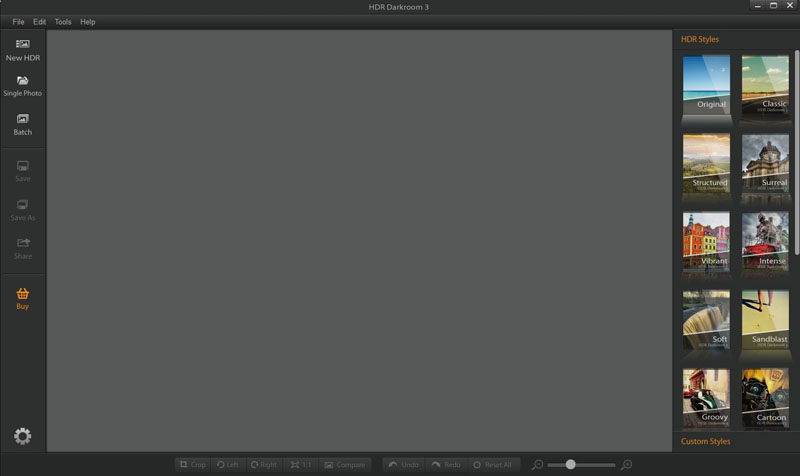
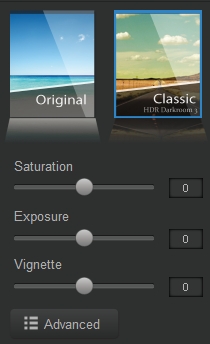
Now that your photo appears in the viewer, you can try some of the different HDR Styles on the right to see how your photo looks with different HDR processing methods. There are 10 HDR Styles in addition to “Natural”. For each HDR Style, you can readily adjust the Brightness, Contrast, and Saturation sliders, as well as click on Advanced for more editing options.
Step 6: Making Advanced Adjustments
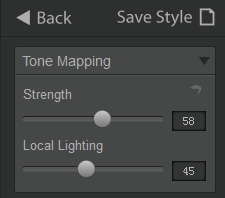
After clicking on the Advanced tab, you will see options for Tone Mapping, Basic Adjustments, Tone Adjustments, Color Adjustments, Smoothness/Sharpness, Chromatic Aberration, and Vignette.
Tone Mapping:
- Radius: This is the distance which distinguishes between local and global contrast. Too low of a radius may make the image appear washed out.
- Strength: Adjusts the local contrast levels
Note: Each HDR style have different adjustments.
Basic Adjustments:
- Saturation: Adjusts the color saturation of the image.
- Exposure: Adjusts the exposure of the image.
- Vignette: Adjusts the vignette of the image.
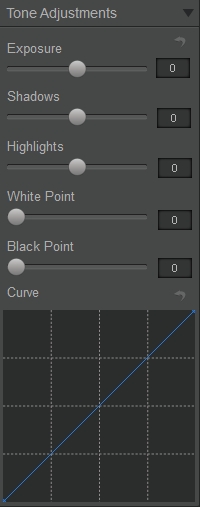
Tone Adjustments:
This module uses different approaches to adjust the tones of the images.
- Exposure: Adjusts the exposure of the image.
- Shadows: Brightens the shadows while leaving the bright areas in the image unaffected.
- Highlights: Darkens the highlights (bright areas) while leaving the shadows unaffected.
- White Point: Specifies which image values represent the brightest white. Moving the slider to the right increases the areas that become white, increasing image contrast. The greatest effect is in the highlights, with much less change in the midtones and shadows.
- Black Point: Specifies which image values represent the darkest black. Moving the slider to the right increases the areas that become black, increasing image contrast. The greatest effect is in the shadows, with much less change in the midtones and highlights.
- Curve: With the Curve adjustment you can create a custom curve. You can use as many defining points as you like, up to 24. If a point on the curve moves up, it becomes a lighter tone; if it moves down, it becomes darker. A straight, 45-degree line indicates no changes to the tonal scale: the original input values exactly match the output values.
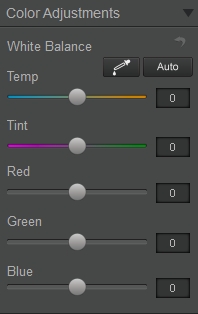
Color Adjustments:
This module uses different approaches to adjust the color of the images.
- White Balance: White Balance is the process of removing unrealistic color casts, so that objects which appear white in person are rendered white in your photo.
- White Balance eye-dropper: Use the eye-dropper selection to click on any area in the image that is neutral gray to remove any color cast.
- Auto: Apply an automatic White Balance technology to remove color cast.
- Temp: The temperature slider lets you manually adjust the White Balance. Move the slider to the left (negative value) to make the photo appear cooler, and right (positive value) to warm the photo.
- Tint: Fine-tunes the white balance to compensate for a green or magenta cast. Move the slider to the left (negative value) to remove a green cast from the photo; move it to the right (positive value) to remove a magenta cast.
- Red: Increase or decrease the component of red color.
- Green: Increase or decrease the component of green color.
- Blue: Increase or decrease the component of blue color.
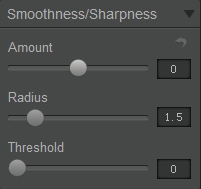
Smoothness/Sharpness
Adjusts the level of sharpening.
- Amount: This slider controls the strength of smoothness and sharpening. Move the slider to the left (negative value) for a smoother (blurrier) effect and move the slider to the right (positive value) for a sharpening effect.
- Radius: This parameter determines the effect of smoothness and sharpening.
- Threshold: Controls the minimum brightness change that will be sharpened. The threshold setting can be used to sharpen more-pronounced edges, while leaving subtler edges untouched. Higher threshold values exclude areas of lower contrast.
Lens Correction:
Lens Correction (Chromatic aberration) is a common property of lenses and is caused by the failure of the lens to evenly focus different colors evenly to the same spot on the camera sensor. This type of aberration is seen as a complementary color fringing in areas away from the center of the image. For example, you may see a red fringe on the side of an object toward the center of the photo, and a cyan fringe on the side of the object away from the center of the photo.
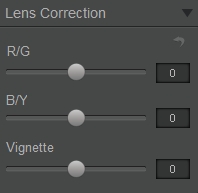
- R/G: Adjusts the size of the red channel relative to the green channel. This compensates for red/green color fringing.
- B/Y: Adjusts the size of the blue channel relative to the yellow channel. This compensates for blue/yellow color fringing.
Vignette:
Vignette makes the edges, especially the corners, of an image darker than the center. Move the slider to the left (negative value) to lighten the corners of the image or move the slider to the right (positive value) to darken the corners of the image.
2.2 Saving your adjustments as a Custom Style
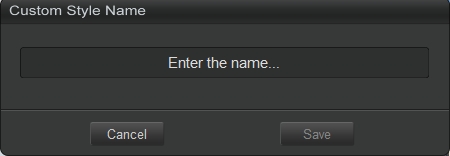
When you find a combination of adjustments that you may want to reuse in the future, you can save it as a Custom Style.
To do this, click on Save Style in the upper right hand corner. You can then enter a name for it and select an icon to represent it. Click Save and your Custom Style is saved. It now appears in the Custom Styles section below the HDR Styles.
![]()
![]()
2.3 Controls on the bottom edge of the viewer
Cropping:
Cropping is also integrated into HDR Darkroom 3, which can be tailored to suit your needs. The following screenshots demonstrate how to use the Crop feature.
Click the (![]() ) to bring up the Crop dialog box. Preset ratios will appear on the right-hand side. You can select a preset cropping ratio here, or customize a ratio based on your preferences. For instance, select the preset ratio 1:1 for a square image, and then apply cropping by clicking on the “Done” button that appears at the bottom of the photo.
) to bring up the Crop dialog box. Preset ratios will appear on the right-hand side. You can select a preset cropping ratio here, or customize a ratio based on your preferences. For instance, select the preset ratio 1:1 for a square image, and then apply cropping by clicking on the “Done” button that appears at the bottom of the photo.
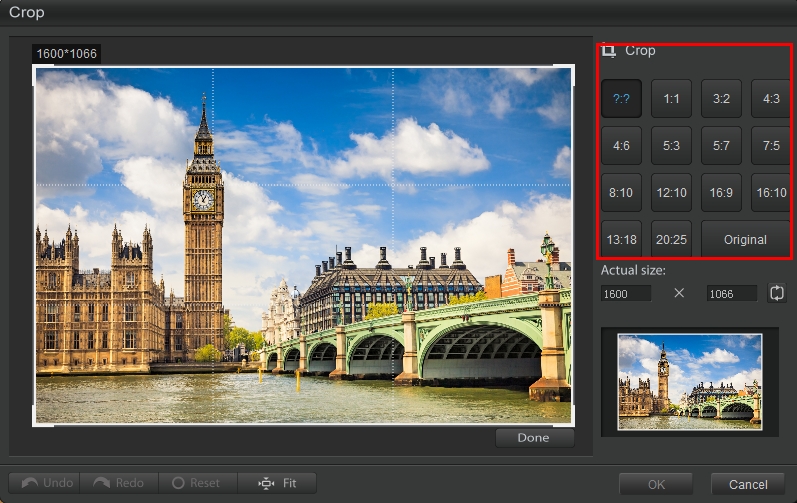
After the boundaries of the photo are exactly where you would like them to be, click on the “OK” button to complete the process.
Rotate L and Rotate R:
![]()
Rotate the photo 90° left and right
1:1/Fit:
Click 1:1 (![]() ) to see your photo at 100% zoom. This means that every pixel in your photo is shown as one pixel on your display. This is the best way to judge things like sharpness, etc. Click Fit (
) to see your photo at 100% zoom. This means that every pixel in your photo is shown as one pixel on your display. This is the best way to judge things like sharpness, etc. Click Fit (![]() ) to return the image to fit within the viewer.
) to return the image to fit within the viewer.
Undo/Redo:
![]()
Allows you to Undo/Redo the last action
Zoom Slider:
![]()
Zoom in/out of the image
3. Batch Processing
3.1 Batch merging bracketed photos into HDR images
If you have a large amount of photos to be processed, you can use our batch processing mode. This feature allows you to process large quantities of images without the need to make manual adjustments for each new set.
Step 1: Open the Batch Processing tool
To use the batch processing mode, click the (icon ) icon on the left hand side of the screen, or select Batch from the Tools menu. The following window will be displayed:
Step 2: Select photos for batch processing
For the “Input” field, select “Browse” to locate the folder with the images you would like to batch process, and click “Choose”. Then, select the number of images per set.
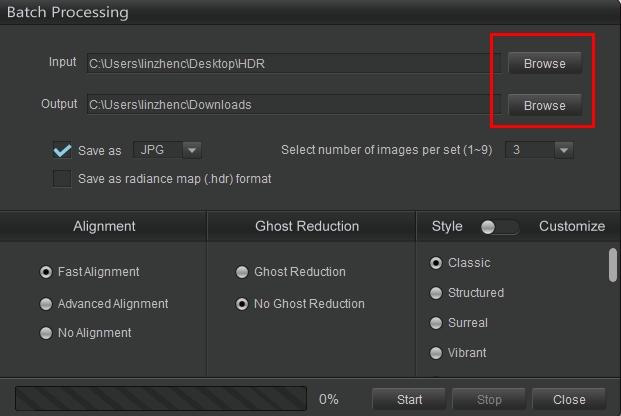
Important Note:
You must specify the number of photos for each set. Let’s say you have two sets of photos. The first set consists of A1, A2, and A3 and the second set consists of B1, B2, B3. You can then place both sets in the same folder as Input and indicate that you would like to select 3 images at a time for batch processing. Each set of photos that are processed within the same batch must consist of the same number of photos. You cannot for example place one set of photos consisting of four differently exposed photos and another set of photos consisting of five differently exposed photos in the Input folder to be processed in the same batch.
Step 3: Select the file location for processed photos
For the “Output” field, select “Browse” to locate the folder where you would like your processed photos to be saved. Then, select the format you would like to use. “Save as JPG” in order to view the processed photos on any device, for printing photos and to share your photos with friends. “Save as radiance map (.hdr) format” for further editing on any HDR software.
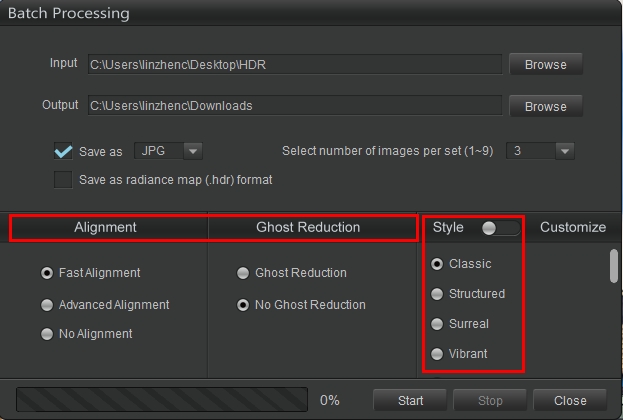
Step 4: Specify alignment, ghost reduction and HDR or Custom Style preferences
For further explanation of these tools, please see HDR Darkroom 3 Workflow in section 2 of the user guide.
Step 5: Start Batch Processing
After you have specified your preferences, click Start to start Batch processing. There may be a slight delay before processing begins depending on the number of sets you have chosen.
3.2 Batch converting single 16-bit RAW files to 8-bit images
You can also use batch processing to convert the 16-bit Camera RAW file format to 8-bit integer values that can be displayed on your monitor. Select 1 in the “Bracketed image number” field to indicate that you will “Input” only 1 photo per set. Then, select "No Alignment" and “No Ghost Reduction” from the menu options at the bottom of the dialog box. Because there is only a single picture per set, there is no need to use these tools. Lastly, indicate which tone mapping method you would like to use and then run the batch.4. Export and Share
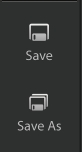
To save your photo to your hard drive or other device, click the Export button on the left-hand toolbar. Then choose the destination and desired file type and click Save.
For sharing your HDR image to Facebook, Flickr, or Twitter, click the Share button and follow the on-screen prompts to sign-in/share to the selected social network.


5. Preferences
Click the ( ) icon on the bottom left-hand side of the screen to open the Preferences dialog box.
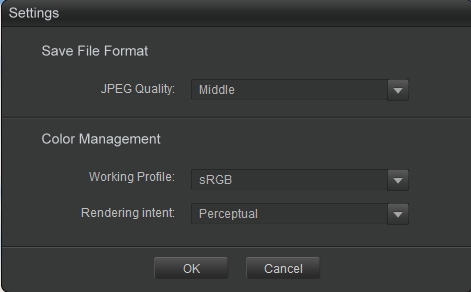
Save File Format:
JPEG quality: Adjust the output quality of JPEG images.
- Low: Smallest file size but relatively lower image quality.
- Middle: Moderate image file size and better image quality. Recommended for uploading and sharing.
- High: Maximum file size but the highest image quality. Recommended for printing.
5.1 Color Mangagement
Working profile: Which working profile you choose depends very much on the later use of your image. For highest compatibility use sRGB. If you only plan to show your images on your monitor or on the Internet this is also a good choice. Because then no profile has to be embedded into a JPG as sRGB is always assumed as default. If you plan to print your image AdobeRGB might be a better choice as it was developed to work best with CMYK devices such as printers. But you could also change to ProPhoto.5.2 Rendering intent
When the gamut of the source color space exceeds that of the destination device (a monitor or printer,) saturated colors are liable to become clipped (inaccurately represented), or “burned.” The color management module can adjust the image to resolve this challenge in several ways. Industry standards, (from the ICC specification) include four different rendering intents: Perceptual, Relative Colorimetric, Saturation and Absolute Colorimetric.Perceptual: If the color gamut of your image is higher than that of your device (monitor or printer) then it is compressed a bit to fit the gamut of your device as far as possible. This might result in an image with reduced saturation, but the hue is still kept as faithfully as possible. While it might look a bit dull, this effect is not really that visible as the color relations stay the same. This method is activated by default (in most cases it is the recommended choice.)
Relative Colorimetric: The colors existing in the color gamut of both your image and your device (monitor or printer) are kept and displayed 100% perfect. If the color does not exist within the color gamut of your device the nearest possible value is taken. This might lead to some banding effects especially visible in blue sky. The white point will be corrected.
Saturation: Very similar to Perceptual, instead keeping the saturation and changing the hue instead. This is very useful for screenshots and similar uses. It could also be used when you do not care of some possible color shift as long the resultant image does not look “dull.”
Absolute Colorimetric: Similar to Relative Colorimetric. It tries to reproduce the exact colors recorded in the original scene. The white point will not be corrected. It is normally to be used when the gamut of your image and your output device are nearly the same.